

How to Check SSL Certificates and Stay Secure
JUMP TO SECTION
Definition
A TLS certificate is a digital certificate that verifies the authenticity of a website and enables encrypted communication between a user’s browser and the server. TLS stands for Transport Layer Security, the modern successor to SSL (Secure Sockets Layer), and is the industry standard cryptographic protocol for securing data in transit. TLS 1.3, the latest version, offers improved security, reduced latency, and stronger encryption algorithms compared to previous versions.
As of early 2025, the internet continues to expand its reach, with approximately 5.56 billion users. This growth is driven by advancements in technologies such as 5G connectivity, the proliferation of mobile devices, and the increasing availability of diverse online content.
The internet now permeates daily life, offering services ranging from simple content delivery and video streaming to complex workspaces and financial solutions. Businesses worldwide are undergoing significant digital transformations, making data more accessible online than ever before.
However, the sensitivity and confidentiality of this data remain paramount. Information involving personal and financial details must be safeguarded with robust security practices. This is where Transport Layer Security (TLS) and Secure Sockets Layer (SSL) protocols play a crucial role in securing and encrypting communication over the internet.
TLS is the industry standard for securing websites, APIs, and online services, as major standards bodies have phased out SSL due to its vulnerabilities. As threats evolve, TLS will continue to adapt with advancements like post-quantum cryptography, while SSL remains obsolete. The current best practice is TLS v1.3, a stepping stone to quantum-safe TLS certificates.
You can easily check whether your connection is secure by verifying the TLS certificate issued by the website you are accessing. As a best practice, only interact with sites that have a valid TLS certificate, as the absence of one may indicate a less trustworthy or unsecured site.
So, how to check HTTPS? Checking if a site is secured with TLS is simple. Every site that uses the TLS certificate system will have the HTTPS protocol specifier in its web address. While HTTP stands for HyperText Transfer Protocol, the S adds the security part provided by TSL. So check for these two things to know whether a site is TLS protected.
The site name should start with HTTPS, e.g., https://www.yoursitename.com.
You can get detailed information about the site’s security by clicking on the site information/padlock icon on your browser application’s address bar.
Now for the in-depth explanation and a deeper understanding of TSL, how it works, and why it is essential, let’s keep reading.
What is a TLS Certificate?
A TLS certificate is a digital certificate that verifies the authenticity of a website and enables encrypted communication between a user’s browser and the server. TLS stands for Transport Layer Security, the modern successor to SSL (Secure Sockets Layer), and is the industry standard cryptographic protocol for securing data in transit. TLS 1.3, the latest version, offers improved security, reduced latency, and stronger encryption algorithms compared to previous versions.
A TLS certificate serves as the website’s public key and is issued by a trusted Certificate Authority (CA). When a user connects to a website, their browser checks the validity of the certificate to be sure the site is legitimate and not an imposter. The private key, held securely by the server, works alongside the public key to establish an encrypted session.
TLS 1.3 eliminates outdated cryptographic algorithms, enhances forward secrecy, and streamlines the handshake process, making secure connections faster and more resilient against attacks. Modern web browsers and servers enforce TLS encryption, so any data exchanged remains confidential and protected from eavesdropping, man-in-the-middle attacks, and unauthorized access.
How Do SSL Certificates Work?
An SSL certificate acts as a digital credential issued by a trusted CA, signaling that the website is legitimate and secure. It enables encrypted communication between your browser and the server, protecting sensitive data—such as passwords, personal information, and payment details—from interception and tampering.
Traditional SSL/TLS Communication
When you visit a website, your browser sends a request to the web server. The server processes this request and returns the appropriate response. While this interaction may seem straightforward, it is vulnerable to man-in-the-middle (MITM) attacks if not properly secured. A malicious actor could intercept the data in transit and extract confidential information.
For example, if you log in to your online banking portal and someone intercepts that traffic, your credentials could be exposed, potentially leading to identity theft or financial loss.
SSL/TLS prevents this by encrypting the data. Even if an attacker intercepts the traffic, the encrypted content will appear as unintelligible gibberish unless they possess the correct decryption key.
SSL uses asymmetric encryption during the initial connection involving a public-private key pair:
- The server holds the private key.
- The client (browser) receives the public key, which it uses to encrypt data.
- Only the server can decrypt the data using its private key.
This process is known as the TLS handshake, which includes:
- Key agreement and exchange (establishing session keys for symmetric encryption)
- Data encryption (using session keys)
- Server authentication (verifying server identity and integrity of data)
The Future of Encryption: Preparing for Post-Quantum
While current SSL/TLS protocols are secure against classical computers, they are not designed to withstand attacks from quantum computers. A sufficiently powerful quantum computer could break traditional encryption algorithms, especially those used in the key exchange during the TLS handshake.
This has led to a growing concern over harvest now, decrypt later (HNDL) attacks, in which adversaries record encrypted traffic today with the intention of decrypting it in the future once quantum capabilities are available, leaving current data vulnerable to encroaching technology.
To defend against this threat, the industry is transitioning toward post-quantum cryptography (PQC). In future versions of TLS, the handshake process will replace traditional key exchange algorithms like RSA with key encapsulation mechanisms (KEMs). KEMs are cryptographic primitives designed to be quantum-resistant as part of the new standards in development by organizations such as NIST and the IETF.
Migrating to PQC-compatible certificates and infrastructure is critical for long-term data confidentiality. As quantum-safe algorithms are finalized and integrated into protocols like TLS 1.3 and beyond, organizations must be proactive in updating their systems to include PQC alongside classical algorithms in a hybrid model—offering both immediate protection and future resilience.
See the Keyfactor Crypto-Agility Platform in action and discover how to find, control, and automate every machine identity.

Various Types Of SSL Certificates
TLS/SSL certificates can be categorized based on two main criteria: the number of domains they secure and the level of validation performed by the CA.
Based on Domain Scope
- Single domain certificate—Secures one fully qualified domain name (FQDN), such www.example.com. It does not cover subdomains or other domains.
- Wildcard certificate—Secures a single domain and all its subdomains. For example, a wildcard certificate for *.example.com covers blog.example.com, mail.example.com, and so on.
- Multi-domain certificate (SAN certificate)—Supports multiple unrelated domains using a single certificate. For example, a single SAN certificate can secure example.com, example.net, and anotherdomain.org.
Based on Validation Level
While all TLS certificates provide the same level of encryption, the validation process performed by the CA differs and directly impacts the level of trust and information displayed in the certificate.
- Domain Validated (DV) Certificate—The CA verifies that the applicant owns or controls the domain. This is the most basic and fastest validation type, usually issued within minutes. No organization details are verified or displayed, so DV certificates are better suited for personal or internal sites rather than commercial or public-facing business websites.
- Organization Validated (OV) Certificate—The CA verifies the domain and legal existence of the organization. Organization details are included in the certificate, offering more credibility than DV. OV certificates are recommended for commercial websites and applications that collect user data.
- Extended Validation (EV) Certificate—This is the highest level of certificate validation. The CA conducts an in-depth review of the organization, including verification of its legal, physical, and operational existence. The request must be initiated by the organization itself. EV certificates are governed by the CA/Browser Forum (CABF) EV Guidelines, established in 2007. Browsers often show enhanced visual indicators (such as the organization’s name) when EV certificates are in use, signaling a higher level of trust to users.
By understanding both the domain scope and validation level, you can choose the right certificate that aligns with your site’s purpose, risk profile, and user trust requirements. Higher validation levels indicate greater credibility, which can be critical for businesses that handle sensitive data or financial transactions.
What Is the Difference Between SSL and TLS?
Transport Layer security (TLS) is the modern standard for securing data transfers over the internet. While often mentioned alongside SSL, TLS is not just a newer version—it is a more secure, more efficient, and actively maintained protocol that has fully replaced SSL in practice.
Originally developed by Netscape in 1994, SSL laid the foundation for encrypted web communication. However, due to serious vulnerabilities and limitations, SSL has been deprecated. The final version, SSL 3.0, was officially retired, and TLS was introduced in 1999 as its successor. Since then, TLS has gone through multiple enhancements, with the latest version (TLS 1.3) released in 2018.
Although the terms SSL and TLS are still used interchangeably in casual conversation and product names, TLS is the protocol actually in use today.
Key differences between SSL and TLS
While both protocols aim to provide secure, authenticated communication, TLS improves upon SSL in several important ways:
- Cipher suites—TLS supports stronger, more modern encryption algorithms such as AES and ChaCha20, improving security and performance.
- Alert messages—TLS offers more detailed and specific error messages, enhancing troubleshooting and clarity over SSL’s generic alerts
- Record protocol—TLS uses HMAC (Hash-Based Message Authentication Code) for data integrity, which is more secure than the basic MAC format used by SSL.
- Handshake process—TLS refines the handshake mechanism to improve speed and security. Unlike SSL, TLS computes hashes over the handshake messages themselves, providing better authentication.
- Message authentication—TLS relies on hash-based authentication using HMAC, while SSL uses less robust techniques involving key data.
Why TLS Matters Today
All modern browsers, APIs, and internet-facing services rely on TLS, not SSL. Major standards bodies and browser vendors have completely phased out SSL support due to its vulnerabilities.
If you are implementing secure communication—whether for a website, email server, or cloud service—you should always use TLS. Continuing to reference SSL is largely a matter of legacy naming, not best practice.
As the internet evolves to handle new threats, including quantum computing, TLS will continue to adapt, incorporating post-quantum cryptography and more efficient handshake mechanisms. As stated above, major standards bodies and browser vendors have completely phased out SSL, making it a protocol of the past.
How To Check SSL Certificates?
All modern browsers make it easy for you to quickly check if a site is secured by SSL encryption or not. The easiest way to know if a site is SSL encrypted or not is to check its URL. The URL of the site should start with HTTPS.
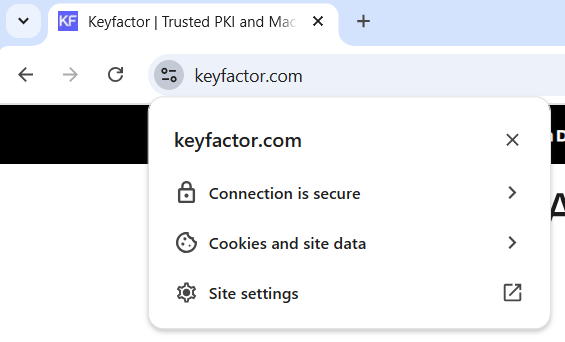
For more details about the site’s security credentials, you can click on the padlock icon near the address bar and get more information on the site’s SSL certificate details.
So, where to find SSL certificates on the server? To view detailed SSL information on popular browsers like Chrome and Firefox, you can follow the below steps:
- Click on the padlock icon in the browser’s address bar. For example, this is how it looks for keyfactor.com
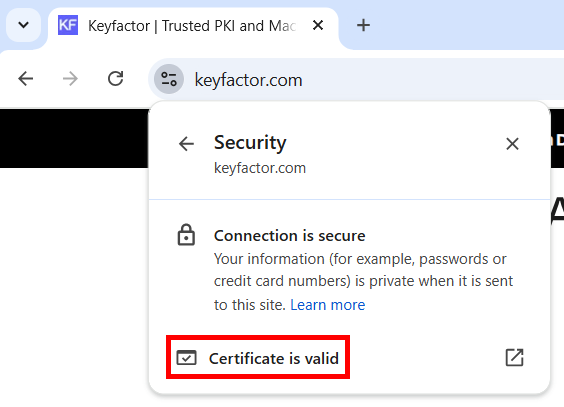
- Click on the certificate pop-up and check the certificate details such as expiry date and the valid duration.

- You will get to see more information in case of extended validation certificates, such as the organization’s identification details. You will only get to see the certifying authority’s details at the bottom section of the pop-up for other types of certificates.
- To get more detailed information about the SSL certificate, such as Certificate Hierarchy, click on the provided tab(s), such as ‘Details’..
How Do You Know If You Have An SSL Certificate?
If you own a site and want to check your SSL certificate, the easiest way is to check your dashboard for any approved certificate issued by a CA. If you have multiple SSL certificates installed for your site, you can locate them using any of the two following methods.
Windows Certificate Manager Tool
SSL checkers or scanners, such as one provided by Keyfactor, are used to scan your entire network and locate all of your installed certificates.
- You can also make use of the Windows Certificate Manager Tool if using the Windows Server environment.
- To view the certificates stored on your local device, launch the Certificate Manager tool.
To do so, open the Command Prompt, type in certlm.msc, and ENTER.
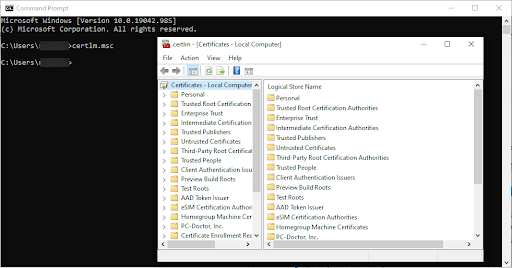
- You can view all the certificates stored in your computer on the left pane and expand the directory to get more detailed information on a certificate.
- For certificates accessible to the current user, launch the Certificate Manager Tool by typing in certmgr.msc in a Command Prompt session.
Certificate Stores
If not using a tool, you can manually search and locate installed certificates in certificate stores. Certificate stores are containers within the server environment that contain all your certificates. Based on the type of certificates stored, Certificate stores can be classified as:
- Personal – These stores contain certificates with private keys
- Trusted Root Certification Authorities – All third-party certificates and certificates from customer organizations will be stored here
- Intermediate certification authorities – These include the certificates issued to subordinate CAs.
If using a Windows Server, you can access the Certificate Store using the following steps:
- Open the MMC (Microsoft Management Console) by entering MMC from a Command Prompt session.
- Click File, and then select Add/Remove Snap-in...
- You will be shown a list of snap-ins. Choose Certificates from the list, then click Add >.
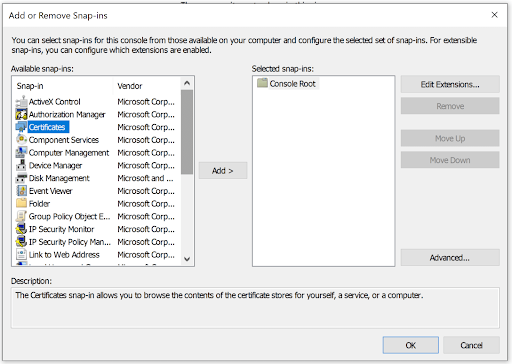
- Select Computer Account, and click Next > Finish. If you wanted to view certificates tied to your identity, you would have selected ‘My user account’ instead.
- Next, click OK, and you will be redirected back to the snap-ins page.
To view a particular certificate in the MMC snap-in, double-click on Certificates (Local Computer) from the left pane, then expand a Certificate Store to view the certificates, such as Personal > Certificates. The available certificates from the selected Certificate Store will be displayed on the middle pane of the window.
To view the certificate, double-click on it. A Certificate window will appear and will show the selected certificate’s different properties, such as the valid duration, expiry date, path, and any associated private key details.
Is My SSL Certificate Valid?
All TLS/SSL certificates come with a finite lifespan with a set expiry date. Upon reaching the expiry date, the certificate will not be considered valid.
Historically, most SSL certificates havea lifespan ranging from one to three years. Today, the longest allowed lifetime is 397 days. However, the CA/Browser Forum, a voluntary gathering of Certificate Issuers and suppliers of Internet browser software and other applications that use certificates (Certificate Consumers), has officially passed a ballot to amend the TLS Baseline Requirements to reduce the maximum lifetime to just 47 days, reflecting the broader industry shift towards increased certificate management agility as a core element of daily PKI operations.
In most cases, a certificate will be replaced once it nears its expiry date. But certain conditions like the Heartbleed vulnerability, SHA-1 deprecation, company mergers, or changes in security policy may require certificates to be reissued sooner. As certificate lifetimes continue to shrink, organizations will need to adopt more automated, agile approaches to manage PKI at scale and avoid service disruptions.
How To Verify SSL Certificates In Windows?
To check if an SSL certificate is installed, you can use the Certificate Manager tool and check its validity period. Another alternative option is to use the sigcheck Windows Sysinternals utility to verify TLS version. Download the utility and run it with the switch command sigcheck -tv. It will list all the trusted Microsoft root Certificate lists.
Self-Signed Certificate
Before installing an SSL certificate, you need to make sure you have valid certificates issued from a CA. To do so, you will have to generate a CSR. CSR stands for Certificate Signing Request, which is how you make an application to receive an SSL certificate from a CA.
A CSR consists of a public key and other details required to validate your identity. You will have to provide information such as the Distinguished Name (DN), Common Name (CN), and fully qualified Domain Name (FQDN) for your website that needs the certificate.
Creating a CSR using Open SSL (cross-platform):
- Run the below command in your terminal
openssl req -out testsite.csr -new -newkey rsa:2048 -nodes -keyout testsite.key
- You might get prompted for an optional password, and you can supply a password to protect your private key. This command will create a CSR as output under the name testsite.csr and a 2048 bit private key under the name testsite.key.
Creating a CSR using certreq on Windows:
If you are using a Windows environment, you can generate a CSR using the built-in certreq tool:
- Create an INF file with the following content
[Version]
Signature=”$Windows NT$”
[NewRequest]
Subject = “CN=www.yourdomain.com, O=Your Organization, L=City, S=State, C=Country”
KeySpec = 1
KeyLength = 2048
Exportable = TRUE
MachineKeySet = TRUE
SMIME = FALSE
PrivateKeyArchive = FALSE
UserProtected = FALSE
UseExistingKeySet = FALSE
ProviderName = “Microsoft RSA SChannel Cryptographic Provider”
ProviderType = 12
RequestType = PKCS10
KeyUsage = 0xa0
[Extensions]
2.5.29.17 = “{text}”
_continue_ = “dns=www.yourdomain.com&”
_continue_ = “dns=yourdomain.com”
- Run the following command in a Command Prompt session:
certreq -new request.inf request.csr
This will generate request.csr. You can now submit this CSR to request signed certificate files from a valid Certifying Authority. After the necessary domain and company validation, the CA will provide you with three files, the private key, the certificate file, and the intermediate certificate file, which can be used to install SSL on your server. The files may also be consolidated into a single PKCS#12 .pfx file where a password is provided for installation.
Self-Signed Certificate Vs. CA-Signed Certificates
While CA-signed certificates are the recommended and trusted way to implement SSL, you can also use self-signed certificates if required. But doing so will throw warning messages in the browsers as it will not be considered from a trusted source.
Use self-signed certificates when you don’t deal with sensitive data or if your target audience is a closed group. If you are running an eCommerce site or dealing with a massive traffic volume, CA-signed certificates are the best way to go.
- To create a self-signed SSL certificate, you can run the following command in your server environment:
openssl x509 -signkey testsite.key -in testsite.csr -req -days 365 -out testsite.crt

- This command generates a certificate file named testsite.com.crt from the CSR file input.
Setting SSL Certificate
Setting SSL Certificate in Linux
If you are using a Linux server environment, installing an SSL certificate will depend on both the operating system and the server you use.
Apache Web Server
After obtaining your certificate files from the Certifying Authority (CA), you should have:
- A certificate file (e.g., ServerCertificate.crt)
- A private key file (e.g., yoursite.key)
- A certificate chain or bundle file (e.g., ChainBundle.crt)
The location of your Apache configuration files may vary depending on your distribution:
- Ubuntu/Debian:
/etc/apache2/apache2.conf or /etc/apache2/sites-available/default-ssl.conf
- Red Hat/Alma Linux/CentOS
/etc/httpd/conf/httpd.conf or /etc/httpd/conf.d/ssl.conf
You can include your certificate entries in the relevant <VirtualHost*:443> block:
<VirtualHost *:443>
DocumentRoot /var/www/html
ServerName testcertificates.com
SSLEngine ON
SSLCertificateFile /etc/apache/ssl.crt/ServerCertificate.crt
SSLCertificateKeyFile /etc/apache/key.crt/yoursite.key
SSLCertificateChainFile /etc/apache/ssl.crt/ChainBundle.crt
</VirtualHost>
To verify the configuration:
sudo apachectl configtest
Then restart Apache:
Ubuntu: sudo systemctl restart apache2
RHEL/Alma Linux: sudo systemctl restart httpd
For NGINX Web Server
If you use NGINX (common on many Linux distributions for performance reasons), the process differs slightly. NGINX requires the certificate and the chain to be combined in one file:
- Combine your certificate and the CA bundle:
cat ServerCertificate.crt ChainBundle.crt > fullchain.pem
- Modify your NGINX server block:
server {
listen 443 ssl;
server_name testcertificates.com;
ssl_certificate /etc/nginx/ssl/fullchain.pem;
ssl_certificate_key /etc/nginx/ssl/yoursite.key;
root /var/www/html;
}
- Test the configuration:
sudo nginx -t
- Restart NGINX:
sudo systemctl restart nginx
Verification
Once the server is restarted, test your SSL installation by visiting your site in multiple browsers and checking for the HTTPS padlock icon. If you encounter issues, double-check that the certificate files match the private key and domain, and contact your CA if needed.
Setting SSL Certificate in Windows
The steps to installing SSL certificates in a Windows Server 2022 using Microsoft IIS 10 are given below.
- Have your certificate, private key and certificate chain or bundle filesready. You can obtain them from the CA for your domain. If possible, obtain this as a single PKCS#12 .pfx file to make the import easy. Just ensure you have the corresponding password for installation. If needed, you could use OpenSSL to combine the files together into this format with the following command:
openssl pkcs12 -export -out combined.pfx -inkey yoursite.key -in ServerCertificate.crt -certfile ChainBundle.crt
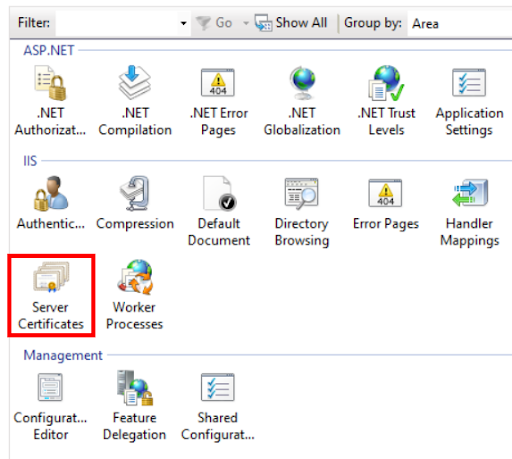
- Launch IIS Manager by clicking the Start button, typing in iis and selecting Internet Information Services (IIS) Manager. You can also press the Windows key + R, type inetmgr and click OK. From the Connections menu tree on the left pane, double-click the server name under Start Page.
- From the server name Home page, the center pane, under the IIS section, double-click Server Certificates.
- Under the Actions menu on the right pane, click Import….
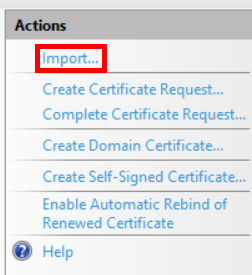
- Browse and upload your certificate .pfx file. Enter the password and change the Certificate Store from Personal to Web Hosting if you plan to load more than 30+ different certificates. Uncheck the box if you don’t want the certificate to be exported from the Certificate Store with the private key. Click OK to save the SSL certificate. It should now be available on the Server Certificate List.
- To bind the installed certificate to your website, from the Connections menu tree, double-click onSites under the server name. From the Sites Home page, the center pane, double-click the site you want to bind the SSL certificate.
- From the right pane, under the Actions menu, click Bindings… then select the Add… button in the Site Bindings window.
- Define the following::
- Type – HTTPS
- IP Address – All unassigned or select from the available IP addresses that correctly applies to the site
- Port as 443 (default) or to the port your SSL traffic listens to
- SSL certificates – the friendly name of the SSL certificate just installed
- Click View to review the details and then OK to finish the binding.
Steps To Renew An SSL Certificate
As mentioned earlier, every SSL certificate comes with an expiry date, after which the browsers will start showing warning messages when the site is accessed. An expired SSL certificate is a security vulnerability you need to take care of at the right time. To avoid the security complications and possible low trust score of an expired SSL certificate, you must renew them on time.
The process is quite similar to getting a new SSL certificate.
- Generate a CSR (Certificate Signing Request)
- Select your SSL certificate and enter the required details like the validity period you need and other details and submit it to the CA.
- You will get renewed certificate files which you can use on your server.
- Renewing SSL certificates will require you to complete the same procedures you did for getting a new SSL certificate. These could be domain validation, organizational validation, and other verifications as needed for the level of certificate you are applying to the CA for.
To Create A New Self-Signed Certificate With The IIS Manager In Windows and Renew a CA Certificate
- Launch the IIS Manager by clicking the Start button, typing in iis and selecting Internet Information Services (IIS) Manager. You can also press the Windows key + R, type inetmgr and click OK.
- From the Connections menu tree on the left pane, double-click the server name under Start Page.
- From the server name Home page, the center pane, under the IIS section, double-click Server Certificates.
Under the Actions menu on the right pane, click on Create Self-Signed Certificate...

- Define an easy-to-use friendly name and change the Certificate Store from Personal to Web Hosting if you plan to load more than 30+ different certificates. Click OK.
- These steps create a self-signed certificate that is valid for one year, and you can find it under the Server Certificates list. At this point, you can bind the certificate to your website as mentioned in the earlier steps.
- As the last step, add your self-signed certificate to your Trusted Root Certificate Authorities.
- Open the MMC (Microsoft Management Console) by entering MMC from a Command Prompt session.
- Click File and then select Add/Remove Snap-in…
- You will be shown a list of snap-ins. Choose Certificates from the list, then click Add >.
- Select Computer Account, and click Next > Finish.
- Click OK, and you will be redirected back to the snap-ins page.
- Double-click on Certificates (Local Computer) from the left pane. Double-click and expand the Certificate Store to view the self-signed certificate that was just created via Personal > Certificates. Copy the self-signed certificate into the Trusted Root Certification Authorities > Certificates folder.
How Do I Remove Expired Digital Certificates?
As already mentioned, all SSL certificates come with an expiry date, after which they will be deemed invalid, and browsers will start throwing up security warnings. You can choose to renew your SSL certificates or remove them and operate your site as a regular HTTP site without the added security layer.
Here are the steps to remove an expired digital certificate in Windows systems:
- Launch the MMC application by going to Start > Run > MMC and then select the snap-in > Certificates
- Select local computer and expand the Certificates folder under the Personal Directory
- You will get a list of certificates listed on the right pane. Right-click on the certificate you want to remove and select delete.
In Linux Ubuntu systems, you can try these steps or use any tool such as the cPanel to manage your server certificates.
- Open terminal and run the below command
sudo dpkg-reconfigure ca-certificates
- You will be shown the list of all certificates from which you can deselect the CAs.
- Alternatively, you can edit the CA file lists stored in the file /etc/ca-certificates.cong and run the below command to update the changes
sudo update-ca-certificates
Running dpkg-reconfigure will also automatically reset the certificates.
How Do I Disable SSL 2.0, SSL 3.0, and TLS 1.0?
TLS protocols are continuously improved to eliminate known vulnerabilities and strengthen overall security. TLS 1.3, the latest and most secure version, not only removes outdated cryptographic algorithms but also lays the groundwork for integrating post-quantum cryptography in the near future. Continuing to use older versions like SSL 2.0, SSL 3.0, or even TLS 1.0 and 1.1 poses serious security risks, as these protocols are no longer considered safe against modern threats.
To maintain strong encryption and long-term data protection, disable all legacy SSL and TLS versions and adopt TLS 1.3 wherever possible:
Disabling Older SSL Versions In Apache Server
Change the configuration settings of your Apache server. The config file may be present in different locations, as listed below. Locate:
- Ubuntu/Debian: /etc/apache2/apache2.conf
- In virtual host debian/Ubuntu systems :/etc/apache2/sites-enabled/
- In virtual host Red Hat/CentOS: /etc/httpd/sites-enabled/
- CentOS/Redhat systems : /etc/httpd/conf/httpd.conf
Once you have located the file, search for the entry “SSLProtocol” and change it to
SSLProtocol all -SSLv2 -SSLv3 -TLSv1 -TLSv1.1
- Restart the apache server
- service httpd restart or
- service apache2 restart
Similarly, for Nginx or TOMCAT servers, modify the config file. Change the ssl_protocols entry to the latest TLS version and restart the server.
To disable the older SSL versions in Windows, you can either use a tool like the IIS crypto tool to modify the SSL versions through a GUI app. To do the same manually, follow the below steps
Open Registry editor by Start > Run > regedit
Find the following registry key/folder:
- If you have SSL 2.0 listed, right click on it and select New-> Key and create a new folder called Server.
- Under the Server folder, click Edit > New > DWORD (32-bit value)
- Enter Enabled and press enter. The data column should have the value 0, if not right-click and set it to zero.
Similarly, repeat the steps to disable SSL3.0 and restart your computer to reflect the changes.
TLS Certificate Automation Benefits
Automating SSL/TLS certificate management is essential for maintaining a secure and reliable online presence. Leverage automation to efficiently monitor and update all of your digital certificates:
- Reduce manual errors and labor overhead, decreasing the likelihood of mistakes and freeing up valuable IT resources.
- Prevent costly TLS certificate mishaps and avoid the pitfalls of downtime.
- Adhere painlessly to the latest security protocols and stay up to date with current standards.
A key component in achieving effective certificate automation is the Automated Certificate Management Environment (ACME) protocol. ACME facilitates the automatic issuance, renewal, and revocation of certificates by streamlining interactions between your web server and Certificate Authorities (CAs). Originally developed for Let’s Encrypt, ACME is now widely supported by various CAs and PKI vendors. Implementing ACME can significantly enhance your organization’s ability to manage certificates efficiently and securely. See our step-by-step guide for more about ACME here.
As you can see, checking a TLS certificate, ensuring it is verified, and removing it when it is beyond the expiration date is essential. However, the involved process is cumbersome and needs technical know-how. Not anymore. Keyfactor’s certificate management and automation solutions are here to help you out.
Contact us to learn more and explore the useful features of Keyfactor.
Secure Devices. Control Your Future
Request a live demo with an expert to see how Keyfactor can help you enable digital trust and crypto-agility for your organization.